Image Optimization: Best Practices for Image SEO
Published: 18 Sep 2025
Do you want your website to load faster, look better, and rank higher on search engines? Then you need to pay attention to image optimization.
Images play a big role in how people experience your site. If they are too heavy, your pages load slowly, which frustrates users and hurts your SEO. But when optimized, images can make your website faster, more user-friendly, and easier to find in search results.

Modern search engines are smarter than ever. They don’t just look at text—they also analyze images to understand what your content is about. This makes image optimization not just a design task but an essential part of SEO strategy.
In this guide, we’ll explain what image optimization is, why it matters, and the best ways to do it. By the end, you’ll know how to make your images work for both users and search engines.
What is Image Optimization?
Image optimization means reducing the size of your images without losing much quality. It makes your website faster and smoother. A slow site can annoy visitors and also affect search ranking. With image optimization, you balance good quality and small file size.
Why we optimize images
- Fast website loading: small images load quickly.
- Better user experience: people stay longer when the site is smooth.
- Saves storage & bandwidth: less space on your hosting.
- Good for SEO: search engines prefer faster sites.
- Works on all devices: from big screens to mobiles.
Other names used for Image Optimization
- Image compression
- Image resizing
- Image reduction
- Image formatting
- Image enhancement (when also improving quality)
Best Practices for Image SEO
Here we will see how to optimize images from an SEO point of view. These best practices help your images rank higher and also keep your website fast.
- Unique Image Content
- Descriptive File Name
- Optimized File Size & Compression
- Use Modern File Format
- Image URL Clarity
- Meaningful Alt Text
- Responsive / Adaptive Images
- Lazy Loading & Priority Loading
- Structured Data Markup
- Image Sitemap
- Browser Caching / CDN Use
- Placement & Context
- Social & Sharing Tags
- Accessibility & Clean Design
- Regular Audit & Maintenance
Let’s now look at each practice in detail.
1. Unique Image Content
Search engines love fresh and original visuals. Stock photos are used everywhere, so they add little value for SEO. But when you upload your own photos, product shots, or custom graphics, your site looks unique and trustworthy.
Why it’s important:
- Unique images stand out in Google Images.
- They make your content different from competitors.
- They build credibility with users.
Quick tip: If you must use stock images, change them a little – add branding, text, or effects so they don’t look like copies.
2. Descriptive File Name
The file name tells search engines and users what the image shows. Random names like IMG001.jpg give no meaning, but a clear name such as red-apple-table.jpg improves SEO and user understanding.
Why it’s important:
- File names help Google identify image content.
- Clear names increase chances of ranking in image search.
- Organized names make image management easier.
Quick tip: Keep names short, use hyphens, and add a keyword only if it fits naturally.
3. Optimized File Size & Compression
Large images can make your website slow. Slow websites frustrate visitors. People may leave before the page loads. Search engines also notice slow pages. Optimizing image size keeps the quality clear. It helps your site load fast and work smoothly on all devices.
Why it’s important:
- Faster load times improve user experience.
- Search engines rank faster sites higher.
- Smaller files save bandwidth, especially on mobile.
Quick tip: Use tools like TinyPNG or Squoosh to reduce file size without losing quality.
4. Use Modern File Format
Image format decides how your picture looks and how fast it loads. Old formats like JPEG and PNG are bigger in size. New formats like WebP and AVIF are lighter and still sharp. They make pages open faster. They also save data for mobile users. Using the right format gives both speed and quality.
Why it’s important:
- Smaller size makes your site faster.
- Clear images keep users happy.
- Modern formats work well on most browsers.
Quick tip: Pick WebP or AVIF for photos and SVG for logos or icons.
5. Image URL Clarity
An image URL shows its location on your site. Random links like IMG001.jpg don’t explain the picture. A clear URL tells Google what the image is about. It also looks neat and easy to share. Clean image links make your site more organized. They help search engines connect images with your page content.
Why it’s important:
- Search engines read URLs for meaning.
- Clean links improve SEO and sharing.
- Easy to manage images on your website.
Quick tip: Keep URLs short, descriptive, and close to the image name.
6. Meaningful Alt Text
Alt text tells what’s inside an image. If the picture doesn’t load, the text still explains it. Screen readers also use it for blind users. Search engines read alt text to understand your image. Good alt text makes images useful and searchable. Short, clear, and direct wording is best.
Why it’s important:
- Helps people with disabilities.
- Improves SEO ranking.
- Works when images fail to load.
Quick tip: Describe the image in simple words. Don’t stuff keywords.
7. Responsive / Adaptive Images
Not all users see your site on the same screen. Some use big desktops, others use small phones. A single large image may look heavy on mobiles. Responsive images adjust to fit all devices. They load fast and stay clear at any size. This keeps the site user-friendly everywhere.
Why it’s important:
- Better speed on all devices.
- Saves mobile data.
- Gives a smooth browsing experience.
Quick tip: Use srcset in HTML or plugins to make images responsive.
8. Lazy Loading & Priority Loading
Images slow down websites if they all load at once. Lazy loading delays images until users scroll to them. Priority loading makes key images appear first. This balance speeds up your site. Users see important visuals right away. Other images only load when needed.
Why it’s important:
- Faster first page load.
- Saves data and bandwidth.
- Improves user experience.
Quick tip: Use WordPress plugins or browser-native loading=”lazy” for easy setup.
9. Structured Data Markup
Search engines need clear info to understand images. Structured data tells Google what your image means. It adds context like captions, product details, or recipes. This helps images show up in rich results. More details = better visibility. Users also trust content with extra info.
Why it’s important:
- Boosts visibility in Google.
- Makes images appear in rich snippets.
- Builds trust with searchers.
Quick tip: Use Schema markup for product, recipe, or article images.
10. Image Sitemap
An image sitemap tells search engines where your images live. It helps Google find visuals hidden in sliders or galleries. Since 2022, some tags like image:title, image:license, image:caption, and image:geo_location no longer work. Only valid image URLs matter now.
Why it’s important:
- Ensures images are found and indexed.
- Avoids errors from outdated tags.
- Improves visibility in Google Images.
Quick tip: Use a plugin to generate a sitemap and include only working image URLs.
11. Browser Caching / CDN Use
Browser caching saves copies of your images so repeat visitors don’t need to download them again. A CDN (Content Delivery Network) delivers images from servers closest to the user. Both make your site faster and smoother.
Why it’s important:
- Cuts loading time for users.
- Reduces server load.
- Improves user experience and SEO.
Quick tip: Enable browser caching in your hosting panel or use a caching plugin. Connect a CDN like Cloudflare for global speed.
12. Placement & Context
Where you place images matters. Images near related text are easier for Google to understand. Random or misplaced visuals confuse both users and search engines.
Why it’s important:
- Gives search engines clear context.
- Keeps users focused on the content.
- Boosts engagement and relevance.
Quick tip: Always place images close to the related heading, paragraph, or section.
13. Social & Sharing Tags
Social platforms like Facebook, X (Twitter), and LinkedIn use tags to display image previews. Open Graph and Twitter Card tags make sure your chosen image shows up when someone shares your page.
Why it’s important:
- Improves how your content looks on social media.
- Increases clicks from shared posts.
- Lets you control the image preview.
Quick tip: Add Open Graph and Twitter Card tags in your SEO plugin and set a custom share image.
14. Accessibility & Clean Design
Accessible images help everyone, including people using screen readers. Clean design means simple, neat visuals that are easy to view. Avoid putting heavy elements, watermarks, or too much text on images. The cleaner the image, the easier it is for both users and search engines to understand.
Why it’s important:
- Makes your site usable for all visitors.
- Improves SEO signals.
- Builds trust and professionalism.
Quick tip: Keep images simple, add clear alt text, and avoid stuffing them with text or clutter.
15. Regular Audit & Maintenance
Image SEO needs ongoing care. Over time, some images may break, slow down your site, or use outdated settings. A regular check keeps everything fresh and working smoothly. Small fixes made often save you from bigger problems later.
Why it’s important:
- Finds and fixes broken image links.
- Keeps page speed fast.
- Ensures all images follow the latest SEO practices.
Quick tip: Review your site monthly with SEO tools or plugins. Replace broken images, compress heavy files, and update missing alt text.
Best Tool for Image Optimization
There are many tools for image optimization, but one of the best is Squoosh, built by Google Chrome Labs. It’s free, works directly in your browser, and gives you full control over compression, resizing, and formats.
Let’s see how to use it step by step.
1. Open the Squoosh App: Go to https://squoosh.app/. The app will load in your browser—no need to install anything.
2. Upload Your Image
- Drag and drop your image into the big center box.
- Or click Open and select a file from your computer.
3. Choose Compression Settings
On the right side, you’ll see options to adjust your image:
- Quality: Move the slider to reduce size while keeping clarity.
- Resize: Change width and height if you need a smaller image.
- Format: Pick formats like JPEG, PNG, or WebP. (Tip: WebP usually gives smaller sizes without losing much quality.)
4. Preview and Compare: Squoosh shows a split-screen preview—original on one side, optimized on the other. This helps you see the effect of your changes before downloading.
5. Download the Optimized Image: When you’re happy with the settings, click Download. Save the optimized image to your computer.
6. Replace on Your Website: Swap the old image with the new optimized version. Keep the same size and aspect ratio so your layout doesn’t break.
Note: Squoosh is powerful for single images. For large websites or e-commerce, pair it with plugins or CDNs for full automation.
Monitoring & Analytics for Image SEO
Optimizing images is not a one-time job. You need to track performance to make sure your site stays fast and your images are helping SEO. Here’s how to monitor and analyze them:
Track Core Web Vitals
Google checks three key metrics:
- LCP (Largest Contentful Paint): How fast the biggest element (often an image) loads.
- INP (Interaction to Next Paint): Measures how fast the page responds to clicks.
- CLS (Cumulative Layout Shift): Checks if images or content shift while loading.
Use Testing Tools
Run your site through free tools like:
- Google PageSpeed Insights – shows Core Web Vitals and image tips.
- GTmetrix – gives a detailed report on speed and image size.
- WebPageTest – helps spot slow-loading images and bottlenecks.
Monitor in Google Search Console
Go to the Image Search performance report. It shows how often your images appear in Google Images and how many clicks they bring.
Check for Broken or Missing Images
Broken images hurt SEO and user trust. Use SEO plugins or crawlers (like Screaming Frog) to scan your site and find any missing images.
Quick tip: Set a monthly schedule to test your site with PageSpeed Insights and Search Console. Fix issues before they impact your rankings.
Common Mistakes to Avoid in Image SEO
So guys, here are some of the most common mistakes people make during image SEO. Avoiding these will keep your site fast, clean, and search-friendly.
- Over-compressing: Makes images blurry and lowers quality.
- Ignoring fallback formats: Some browsers don’t support modern formats like WebP.
- Oversized dimensions: Large images slow down loading and waste bandwidth.
- Too many stock photos: Generic visuals add no unique value for SEO.
- Skipping alt text: Search engines and screen readers miss important context.
- Forgetting metadata: Missing titles or descriptions can reduce visibility.
Quick tip: Always balance quality and size, use the right format, and write helpful alt text.
Case Study & Example
Here is a before/after optimization showing speed improvements. The example: product site gaining higher rankings via optimized images
Imagine a small e-commerce site selling handcrafted jewelry. Before optimization, their product pages were laden with high-resolution, uncompressed images straight from the photographer.
Before Optimization:
- Image File Sizes: Average 2-5 MB per product image.
- Page Load Time (Product Page): 8-12 seconds (on a typical broadband connection).
- User Experience: High bounce rate, especially on mobile, as users got frustrated waiting.
- Search Engine Ranking: Struggling to rank on the first few pages for competitive keywords, partly due to slow load times.
Here’s how a typical unoptimized product image might have looked:
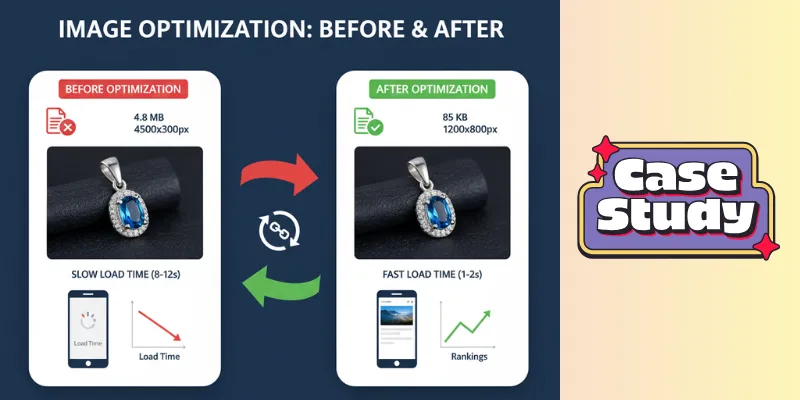
After Optimization:
- Resizing: Images were resized to appropriate display dimensions (e.g., max 1200px width for large displays, smaller for thumbnails).
- Compression: Lossy compression (e.g., using tools like TinyPNG or compressor.io) was applied to drastically reduce file sizes without noticeable quality loss.
- Next-Gen Formats: Implemented WebP format for modern browsers, with a JPEG fallback.
- Lazy Loading: Images loaded only as they scrolled into the viewport.
- CDN: Used a Content Delivery Network to serve images faster globally.
- Image File Sizes: Average 80-150 KB per product image (a 95%+ reduction!).
- Page Load Time (Product Page): 1-3 seconds.
- User Experience: Significantly improved, leading to lower bounce rates and higher engagement.
- Search Engine Ranking: Within 3-6 months, the site saw a noticeable improvement in search engine rankings for key product terms, attributing part of this success to improved page speed, a known Google ranking factor.
Conclusion
In this guide, we covered what image SEO, or image optimization, is in detail. You now know why images matter for speed, SEO, and user experience.
These days, AI is growing fast. It can help suggest better formats, compress images automatically, and even generate optimized visuals. But the basics—good file names, alt text, proper size, and clear placement—still matter most.
My personal recommendation:
- For design and unique images → use Canva.
- For optimizing images before upload → use Squoosh.
- For WordPress → try plugins like ShortPixel or Smush.
Follow these steps, and your images will help your website rank higher, load faster, and attract more visitors. Now, check out the FAQs below to answer common questions about image SEO.
FAQs
Here are some of the most commonly asked questions related to what is image SEO:
Image SEO means making your images fast and easy to find. It keeps images small but clear. Optimized images help your website load faster. They also help Google understand your pictures. This can bring more visitors to your site.
In Photoshop, you can make images smaller and faster for the web. You can choose formats like JPEG or PNG. You can also resize without losing quality. Optimized images look good and load quickly on websites.
Open your image in Photoshop. Go to File → Export → Save for Web. Pick JPEG or WebP format. Adjust quality to reduce size. Save and upload to your site.
An image resizer changes the width and height of an image. It makes images fit your website. Smaller images load faster. You can use online tools or plugins. This also improves SEO.
An image compressor makes files smaller without losing clarity. Smaller files load faster. Tools like TinyPNG and Squoosh do this. It saves bandwidth and helps SEO.
Most website images should stay under 200 KB. Never upload images in MB size—they are too big and slow down your site. Using tools like Squoosh or TinyPNG, you can compress images even to 15–30 KB without losing quality.
Use 2048 × 2048 pixels for Shopify products. Keep file size under 500 KB. Use square images for consistency. Optimize format for faster loading.
Set image size for your page layout. Don’t upload bigger images than needed. Use width and height in HTML. It helps pages load faster and prevents layout shifts.
Google Images is a search engine for pictures. Optimized images can appear here. Use alt text, file names, and sitemaps. It brings more clicks and visitors.
An image SEO tool makes images faster and search-friendly. It can compress, resize, or add alt text. Some tools also make sitemaps. It saves time and helps SEO.
Yes, free tools like Squoosh, TinyPNG, and ImageOptim exist. They compress and convert images. Some plugins like Smush also have free versions. They help SEO without cost.


- Be Respectful
- Stay Relevant
- Stay Positive
- True Feedback
- Encourage Discussion
- Avoid Spamming
- No Fake News
- Don't Copy-Paste
- No Personal Attacks
- Be Respectful
- Stay Relevant
- Stay Positive
- True Feedback
- Encourage Discussion
- Avoid Spamming
- No Fake News
- Don't Copy-Paste
- No Personal Attacks
